Authentication

I decided to make two-part authentication series. In this first part, we will make default authentication UI component from AWS Amplify, and in the next part we will look through how to create it from scratch with custom design.

The source code for this part is available on GitHub.

AWS Amplify

Cognito

Step01

Create a new project ⚛️#

npx react-native init auth

We start the project 🚀 Enter the project folder from run it.
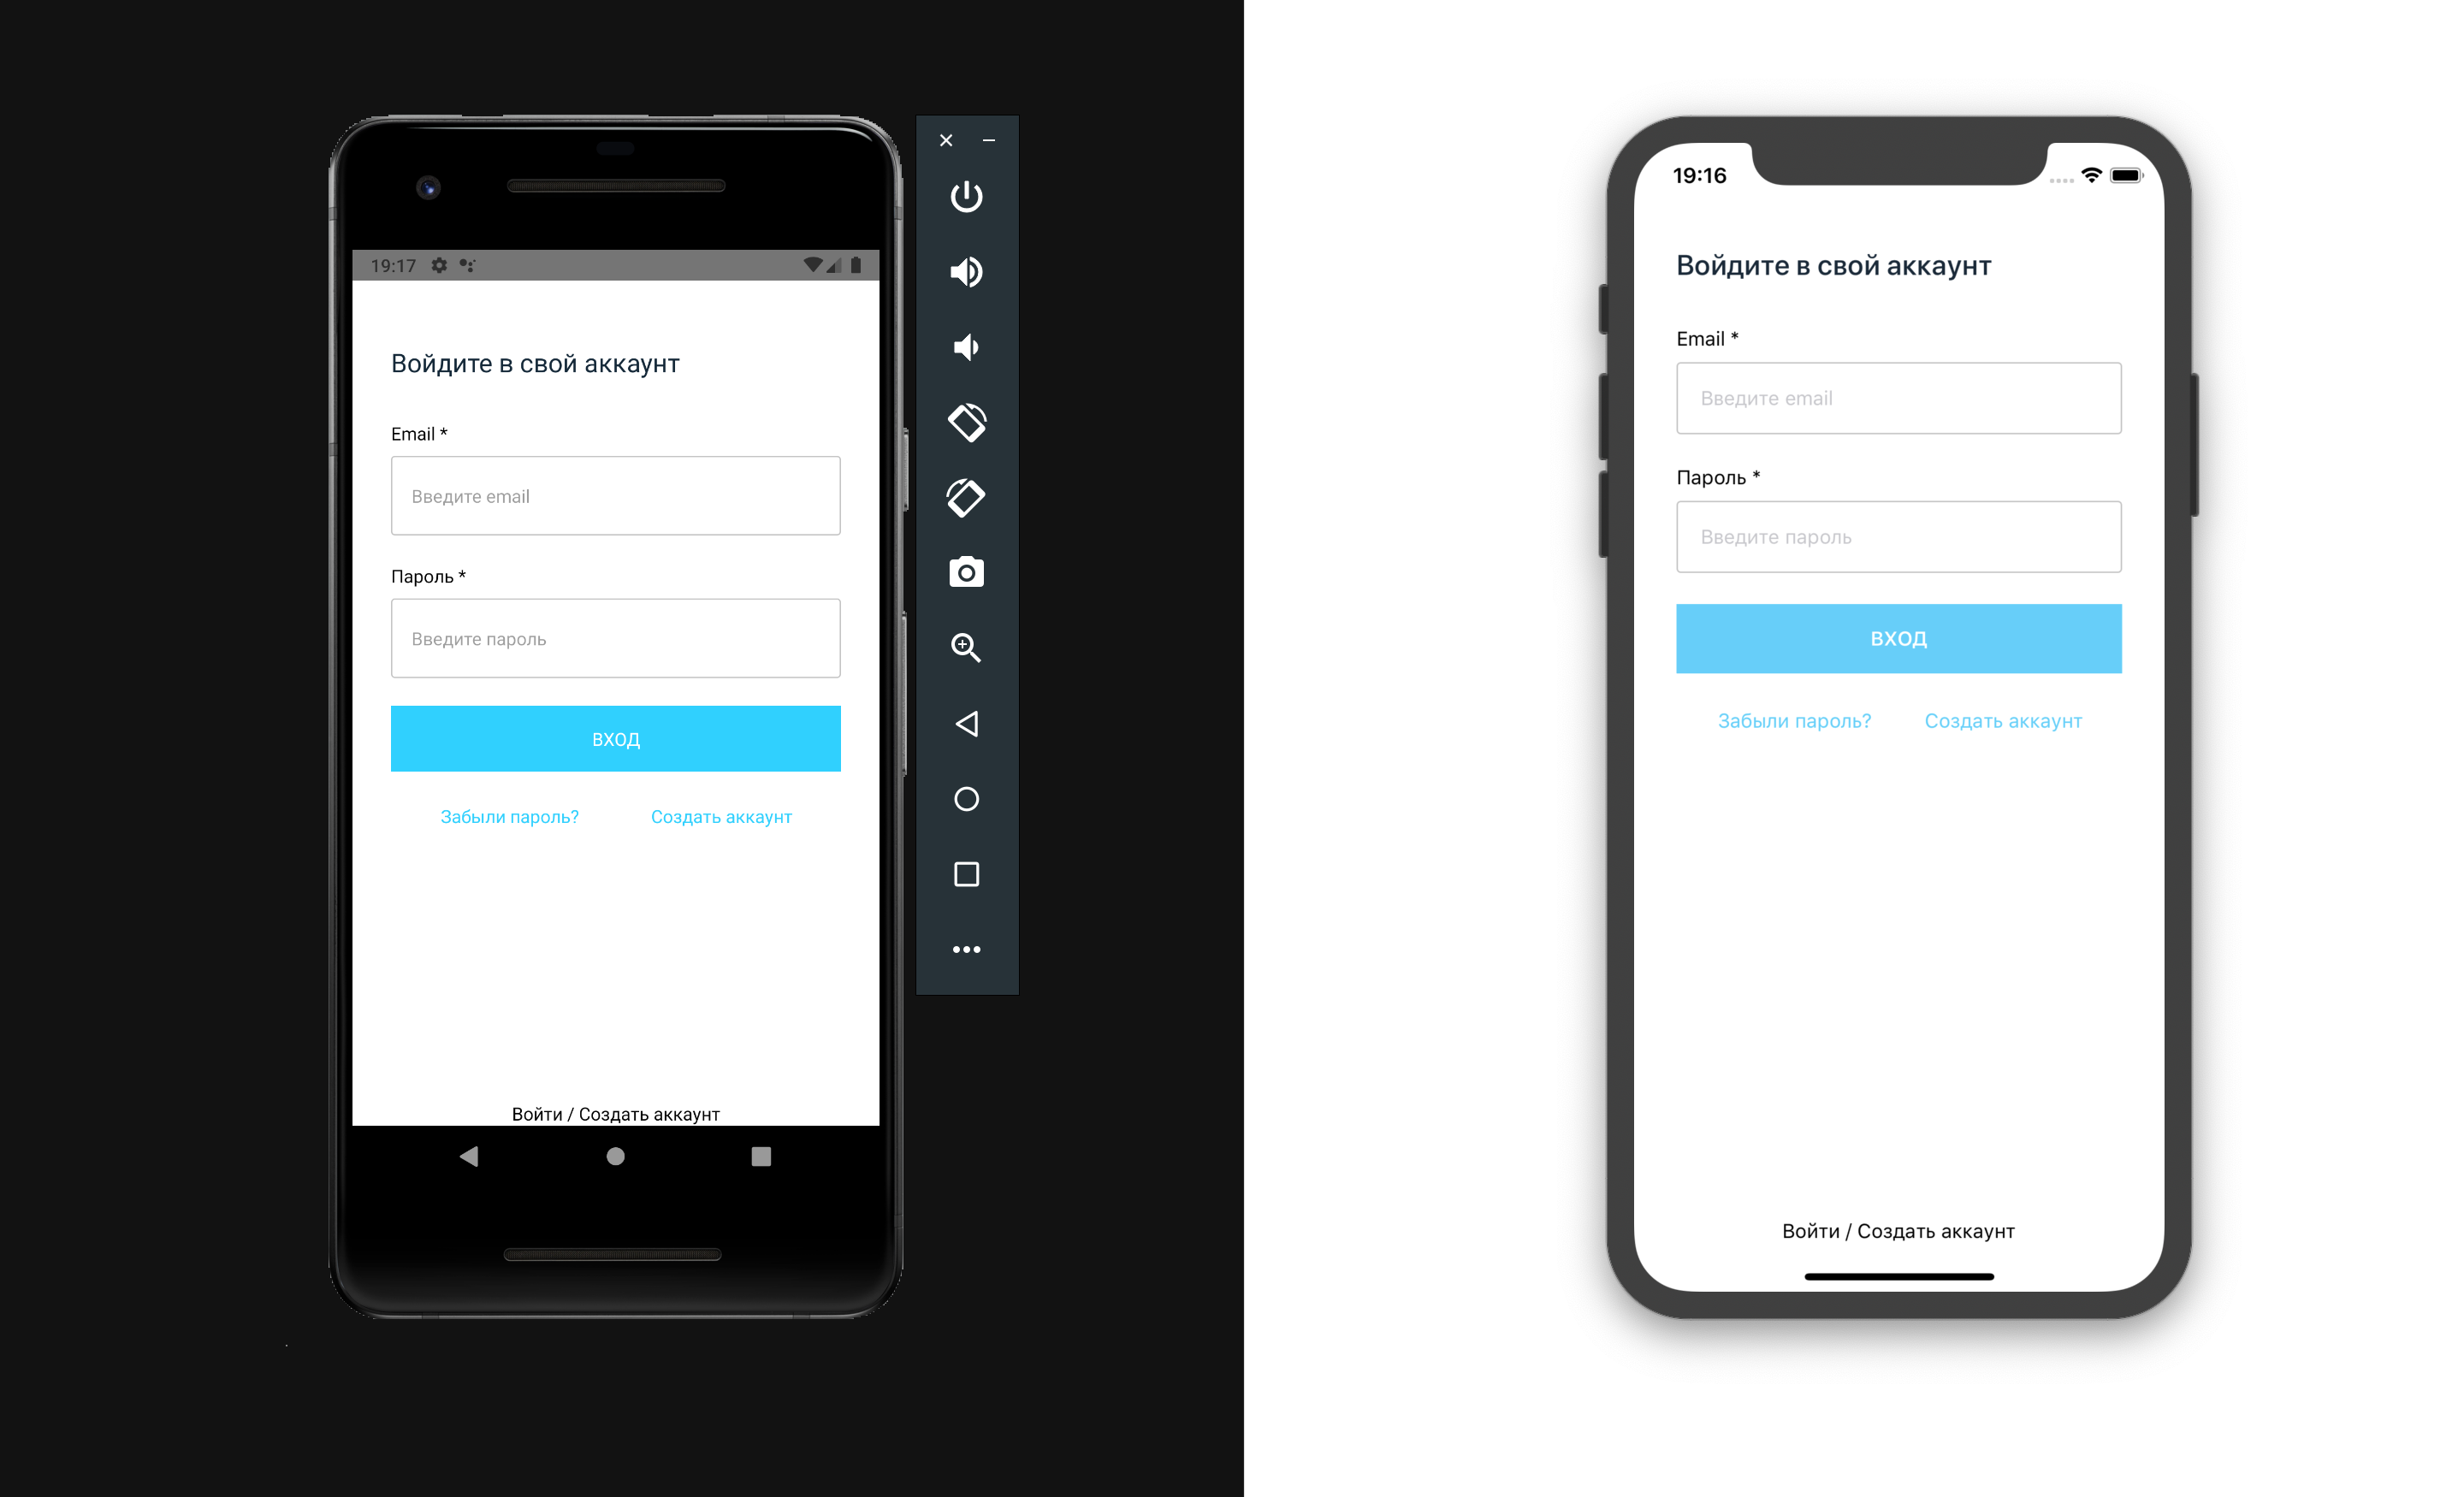
iOS

cd auth && react-native run-ios

Android

cd auth && react-native run-android

Step02

Connect the icons 👾#

Since the icons are used by the AWS Amplify framework, we therefore connect them according to this instructions 📃. Check for errors.

Add to App.js

import Icon from 'react-native-vector-icons/FontAwesome5'
const App = () => {
return (
<>
<Icon name="comments" size={30} color="#900" />
</>
)
}

In order to see errors and automatically align the code, install ESLint & Prettierrc

Step03

Register your AWS account#

Register using this instruction 📃 and check out all 5 steps in the video tutorial.

You need a bank card 💳, where should be more than 1 \$ 💵

There we look and put the Amplify Command Line Interface (CLI)

Step04

Initializing AWS Amplify in a React Native Project#

Initialize our AWS Amplify project in the root directory.

amplify init

Answer these questions:

amplify init

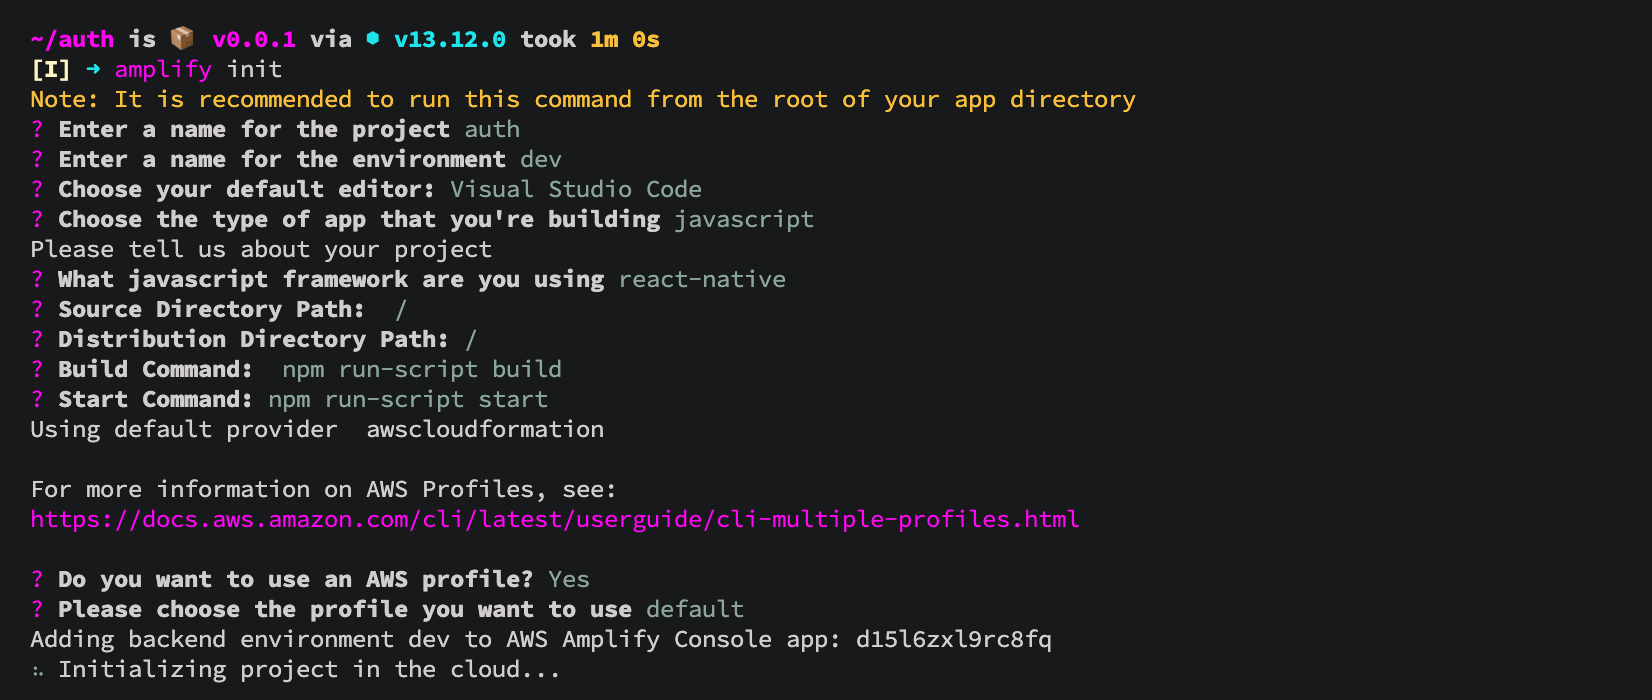
The project successfully initialized 🚀

Step05

Connect authentication plugin#

Now that the application is in the cloud, you can add some features, such as allowing users to register with our application and log in.

Use command:

amplify add auth

Connect the authentication function. Select the default configuration. This adds auth resource configurations locally to your ampify/backend/auth directory

amplify init

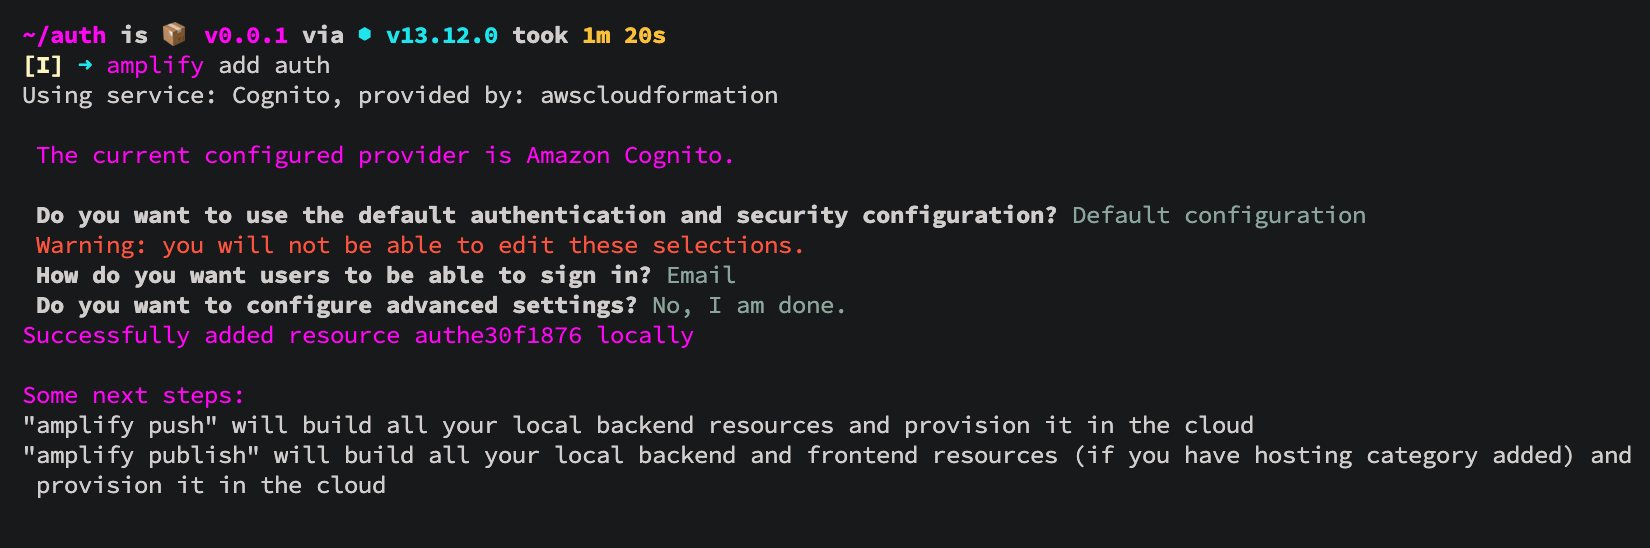
Submit changes to the cloud 💭

amplify push

✔ All resources are updated in the cloud

Step06

Connect AWS Amplify to React Native#

Details can be found in this instruction 📃.In short, you can add these dependencies below to connect AWS Amplify:

yarn add aws-amplify @aws-amplify/core aws-amplify-react-native amazon-cognito-identity-js @react-native-community/netinfo

After installation, make sure to go to the ios folder and set the pods

cd ios && pod install && cd ..

Step07

Edit the project structure#

Create /src directory and transfer the App.js file there, then rename it to index.js

Edit import in /auth/index.js and hide future warnings.

import { AppRegistry, YellowBox } from 'react-native'
import App from './src'
import { name as appName } from './app.json'
YellowBox.ignoreWarnings([
'Warning: AsyncStorage',
'Warning: componentWillReceiveProps',
'RCTRootView cancelTouches',
'not authenticated',
'Sending `onAnimatedValueUpdate`'
])
//window.LOG_LEVEL = 'DEBUG'
AppRegistry.registerComponent(appName, () => App)

Step08

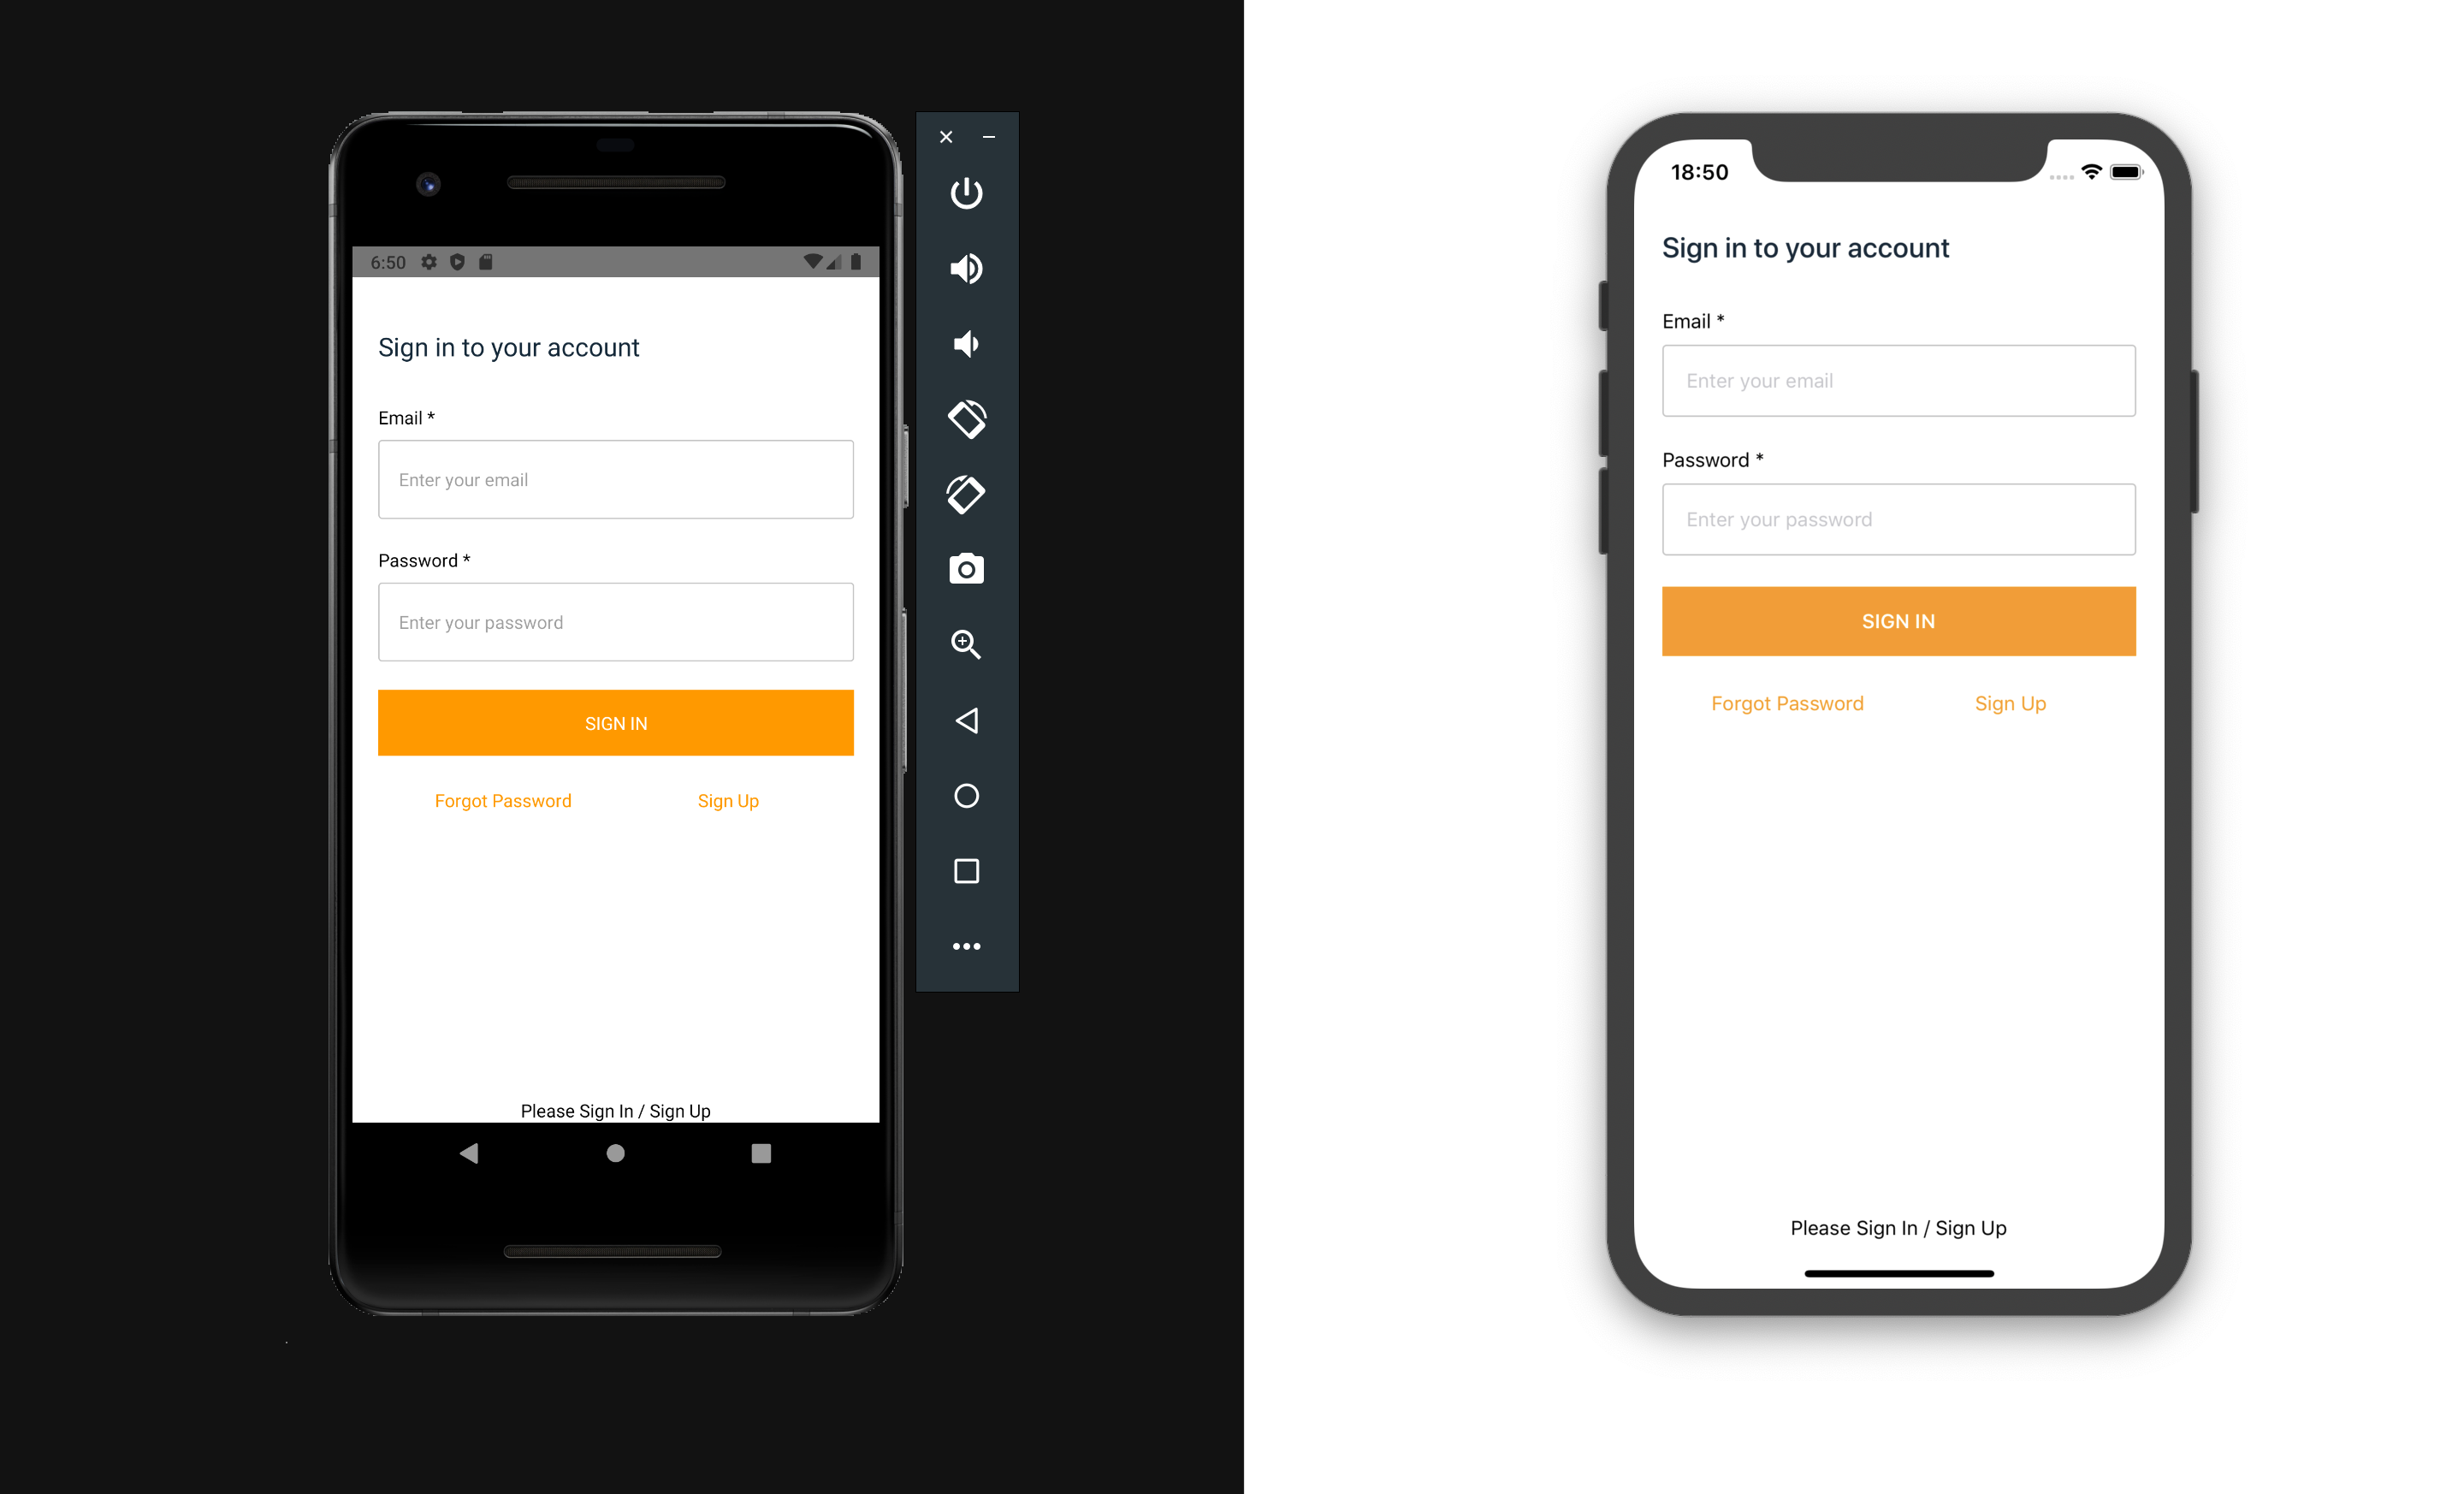
Minimum project configuration and Authenticator module#

Amplify.configure - project configuration

Authenticator - The AWS Amplify Authentication Module provides authentication APIs and building blocks for developers who want to create user authentication.

import React from 'react'
import { StatusBar } from 'react-native'
import Amplify from '@aws-amplify/core'
import { Authenticator } from 'aws-amplify-react-native'
import awsconfig from '../aws-exports'
Amplify.configure({
...awsconfig,
Analytics: {
disabled: true
}
})
const App = () => {
return (
<>
<StatusBar barStyle="dark-content" />
<Authenticator usernameAttributes="email" />
</>
)
}
export default App

We start the simulator, where we are met by the authentication UI component:

Cognito

Step09

Edit Inputs in ./src/index.js#

To do this, add signUpConfig

const signUpConfig = {
hideAllDefaults: true,
signUpFields: [
{
label: 'Email',
key: 'email',
required: true,
displayOrder: 1,
type: 'string',
},
{
label: 'Password',
key: 'password',
required: true,
displayOrder: 2,
type: 'password',
},
],
}
<Authenticator
usernameAttributes="email"
signUpConfig={signUpConfig}
/>

Step10

Change UI theme 🖌#

Create an export point for our future components /src/components/index.js with content

export * from './AmplifyTheme'

and accordingly create the /src/components/AmplifyTheme/index.js theme file itself with the content

import { StyleSheet } from 'react-native'
// Colors
export const deepSquidInk = '#152939'
export const linkUnderlayColor = '#FFF'
export const errorIconColor = '#DD3F5B'
export const textInputColor = '#000000'
export const textInputBorderColor = '#C4C4C4'
export const placeholderColor = '#C7C7CD'
export const buttonColor = '#FF06F4'
export const disabledButtonColor = '#FF9FFB'
const AmplifyTheme = StyleSheet.create({
container: {
flex: 1,
flexDirection: 'column',
alignItems: 'center',
justifyContent: 'space-around',
paddingTop: 20,
width: '100%',
backgroundColor: '#FFF'
},
section: {
flex: 1,
width: '100%',
justifyContent: 'space-between',
paddingHorizontal: 20
},
sectionScroll: {
flex: 1,
width: '100%',
paddingHorizontal: 20
},
sectionHeader: {
width: '100%',
marginBottom: 32,
paddingTop: 20
},
sectionHeaderText: {
color: deepSquidInk,
fontSize: 20,
fontWeight: '500'
},
sectionFooter: {
width: '100%',
padding: 10,
flexDirection: 'row',
justifyContent: 'space-between',
marginTop: 15,
marginBottom: 20
},
sectionFooterLink: {
fontSize: 14,
color: buttonColor,
alignItems: 'baseline',
textAlign: 'center'
},
sectionFooterLinkDisabled: {
fontSize: 14,
color: disabledButtonColor,
alignItems: 'baseline',
textAlign: 'center'
},
navBar: {
marginTop: 35,
padding: 15,
flexDirection: 'row',
justifyContent: 'flex-end',
alignItems: 'center'
},
navButton: {
marginLeft: 12,
borderRadius: 4
},
cell: {
flex: 1,
width: '50%'
},
errorRow: {
flexDirection: 'row',
justifyContent: 'center'
},
errorRowText: {
marginLeft: 10
},
photo: {
width: '100%'
},
album: {
width: '100%'
},
button: {
backgroundColor: buttonColor,
alignItems: 'center',
padding: 16
},
buttonDisabled: {
backgroundColor: disabledButtonColor,
alignItems: 'center',
padding: 16
},
buttonText: {
color: '#fff',
fontSize: 14,
fontWeight: '600'
},
formField: {
marginBottom: 22
},
input: {
padding: 16,
borderWidth: 1,
borderRadius: 3,
borderColor: textInputBorderColor,
color: textInputColor
},
inputLabel: {
marginBottom: 8
},
phoneContainer: {
display: 'flex',
flexDirection: 'row',
alignItems: 'center'
},
phoneInput: {
flex: 2,
padding: 16,
borderWidth: 1,
borderRadius: 3,
borderColor: textInputBorderColor,
color: textInputColor
},
picker: {
flex: 1,
height: 44
},
pickerItem: {
height: 44
},
signedOutMessage: {
textAlign: 'center',
padding: 20
}
})
export { AmplifyTheme }

Apply the theme into the Authenticator component src/index.js

import { AmplifyTheme } from './components'
const App = () => {
return (
<>
<StatusBar barStyle="dark-content" />
<Authenticator usernameAttributes="email" signUpConfig={signUpConfig} theme={AmplifyTheme} />
</>
)
}

AmplifyTheme

Step11

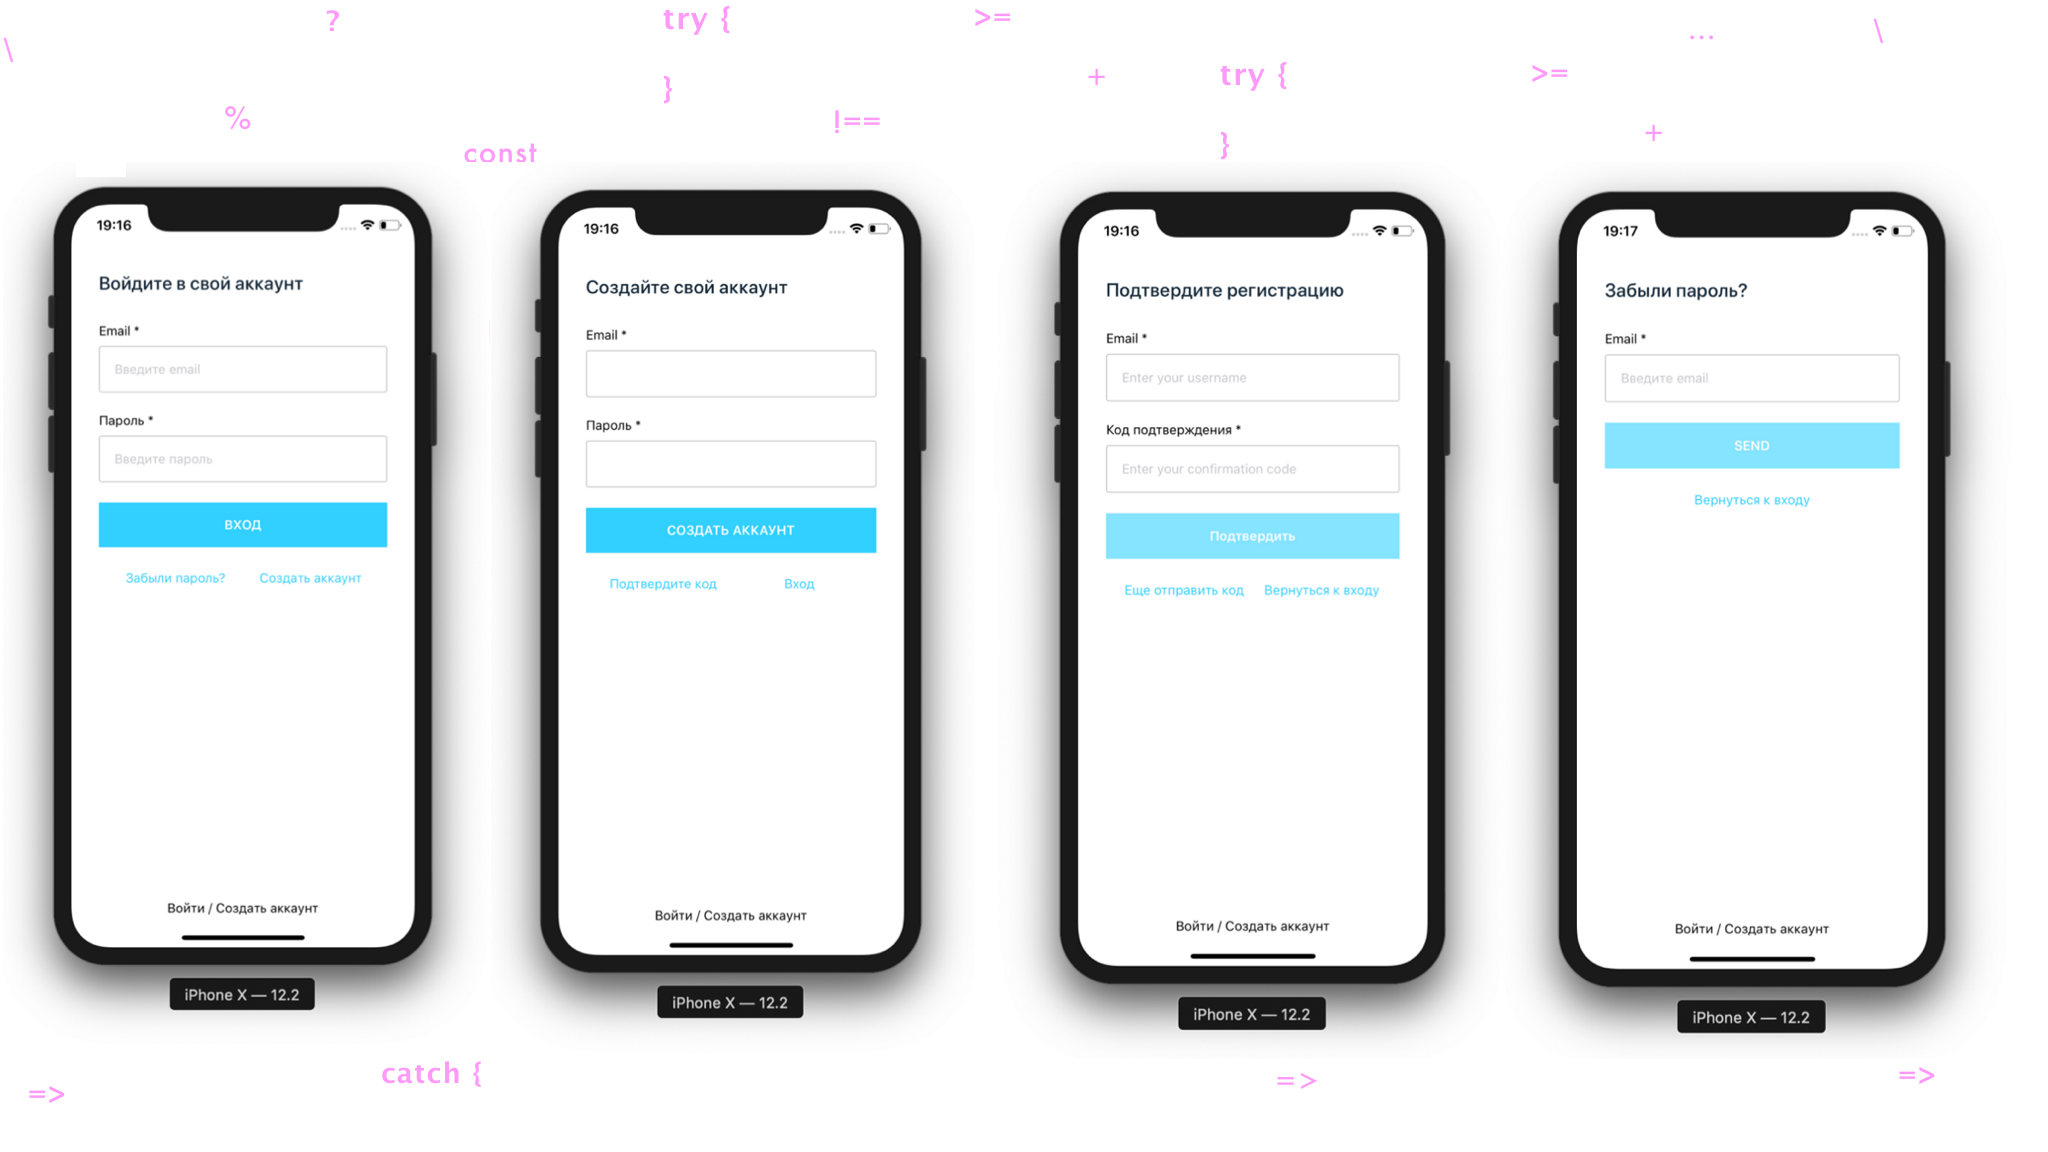
Connect localization#

In our case, the Russian language 🇷🇺

Add export to /src/components/index.js

export * from './Localei18n'

Create the file /src/components/Localei18n/index.js with the contents

import { NativeModules, Platform } from 'react-native'
import { I18n } from '@aws-amplify/core'
let langRegionLocale = 'en_US'
// If we have an Android phone
if (Platform.OS === 'android') {
langRegionLocale = NativeModules.I18nManager.localeIdentifier || ''
} else if (Platform.OS === 'ios') {
langRegionLocale = NativeModules.SettingsManager.settings.AppleLocale || ''
}
const authScreenLabels = {
en: {
'Sign Up': 'Create new account',
'Sign Up Account': 'Create a new account'
},
ru: {
'Sign Up': 'Создать аккаунт',
'Forgot Password': 'Забыли пароль?',
'Sign In Account': 'Войдите в систему',
'Enter your email': 'Введите email',
'Enter your password': 'Введите пароль',
'Password': 'Пароль',
'Sign In': 'Вход',
'Please Sign In / Sign Up': 'Войти / Создать аккаунт',
'Sign in to your account': 'Войдите в свой аккаунт',
'Create a new account': 'Cоздайте свой аккаунт',
'Confirm a Code': 'Подтвердите код',
'Confirm Sign Up': 'Подтвердите регистрацию',
'Resend code': 'Еще отправить код',
'Back to Sign In': 'Вернуться к входу',
'Confirm': 'Подтвердить',
'Confirmation Code': 'Код подтверждения',
'Sign Out': 'Выход'
}
}
// "en_US" -> "en", "es_CL" -> "es", etc
const languageLocale = langRegionLocale.substring(0, 2)
I18n.setLanguage(languageLocale)
I18n.putVocabularies(authScreenLabels)
const Localei18n = () => null
export { Localei18n }

And we connect the Localei18n component in src/index.js

import {
AmplifyTheme,
Localei18n
} from './components'
<Localei18n />
<Authenticator
usernameAttributes="email"
signUpConfig={signUpConfig}
theme={AmplifyTheme}
/>

We start the project, where we see that localization has not yet been applied. Therefore, we change the language into Russian in the settings of our simulator

Localei18n

Done ✅#

Become a Patron!